Installing a HUD in a Non-HUD dash
 11-16-2008, 08:22 PM
#1
Registered User
Thread Starter
Join Date: Aug 2008
Location: Red Lion PA
Posts: 353
Ok, so after searching dash removal and trying to find ANY info about modifying an non-HUD dash to accept the HUD, I got bubkiss, absolutely nothing. So, I decided to just tear the thing apart on my own and figure it out as I went. So here is what I found out.
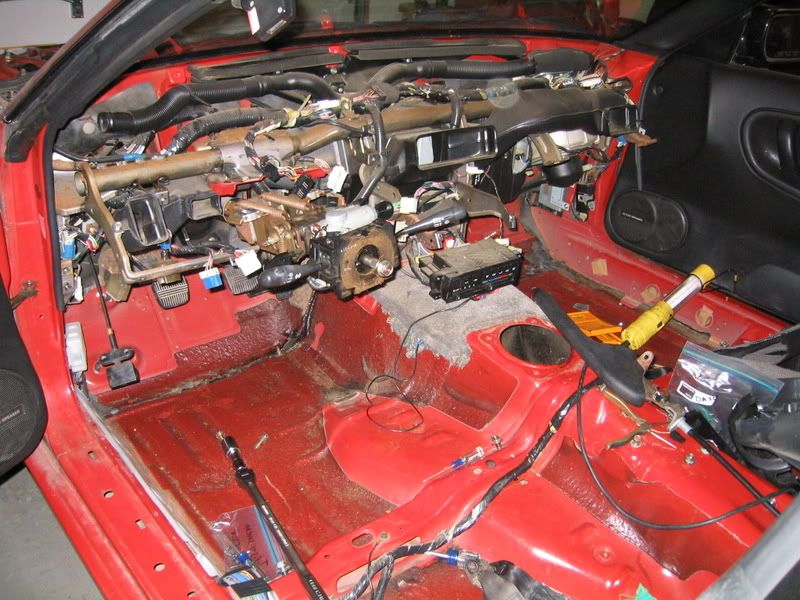
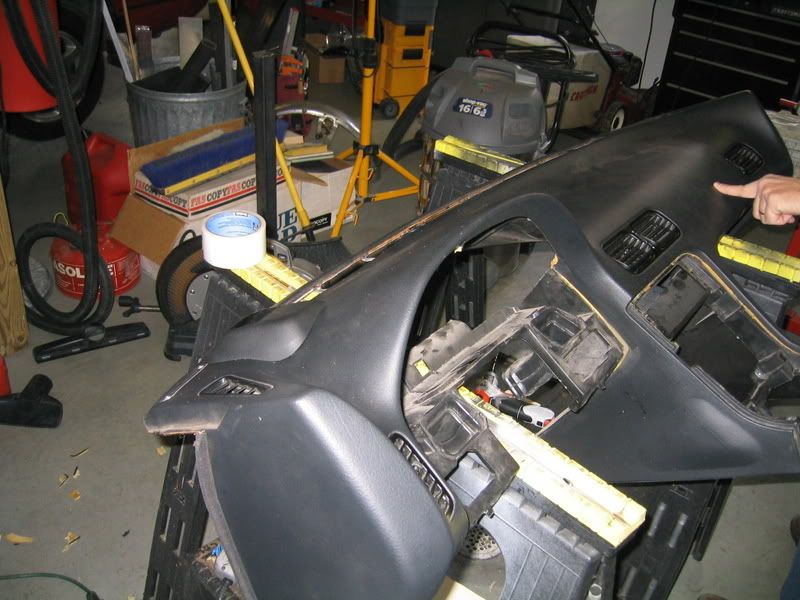
I removed my dashboard this evening using the directions found on NICO, but this forum wont let me link to them. Thanks to MrZabala and NICO for thier tech section. Currently my interior looks like this:
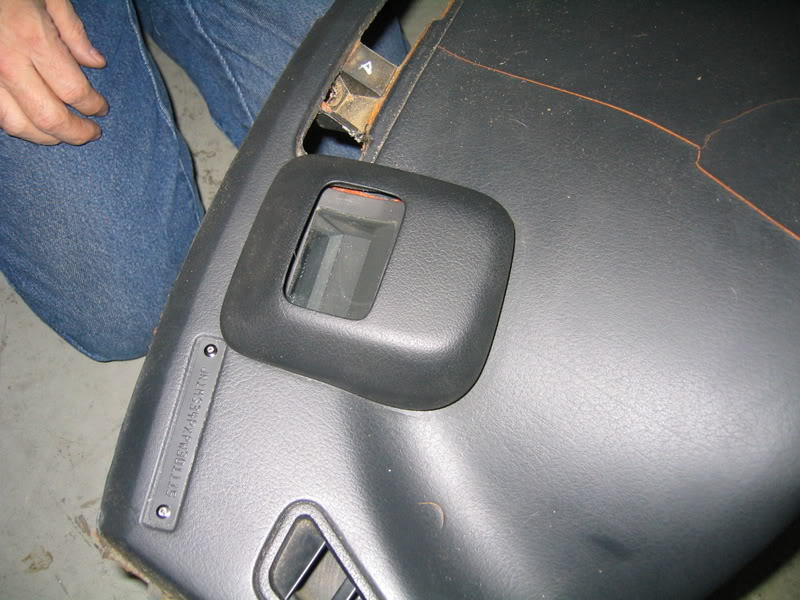
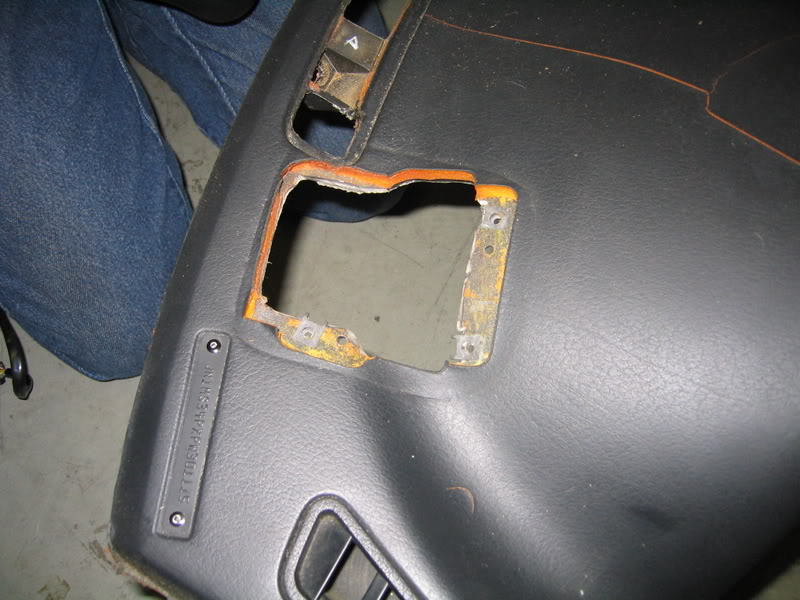
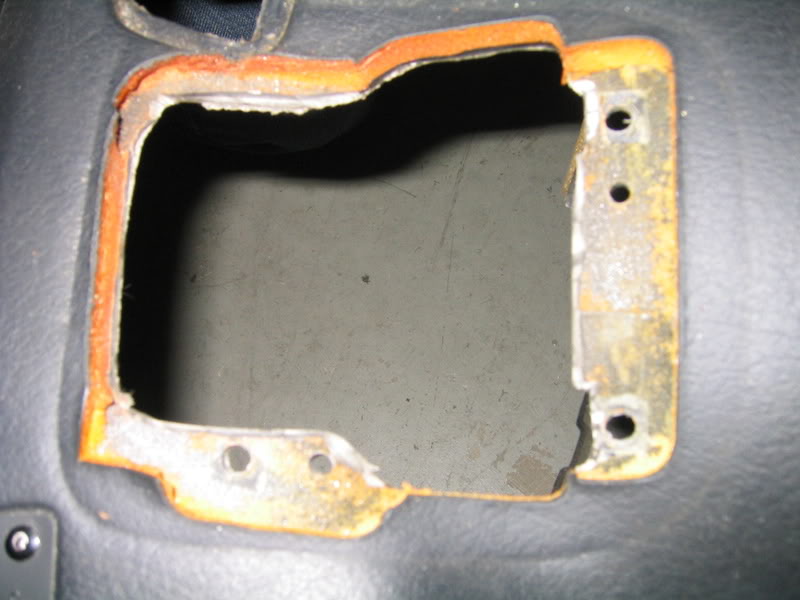
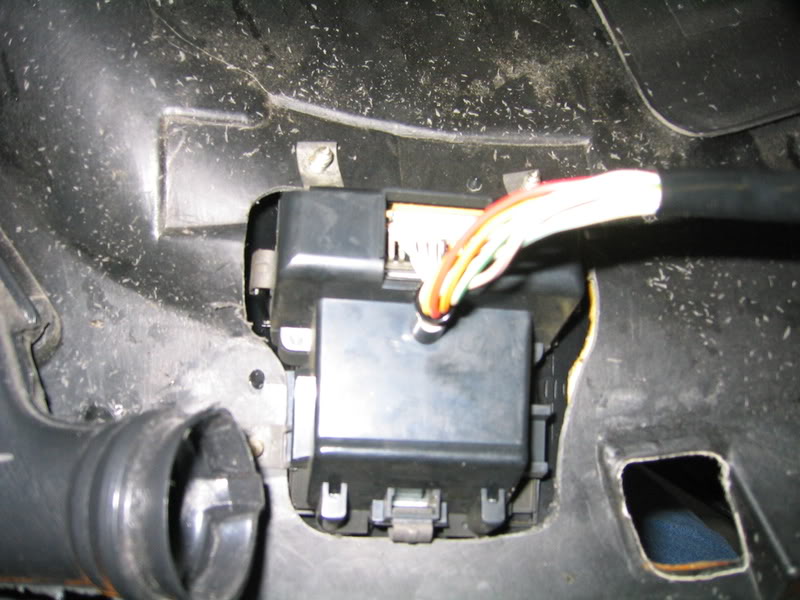
Here is what I've figured out about the HUD system. The dash is cut all the way through with metal threaded clip nuts (dont know the real name) that allow the HUD to bolt to. Once the HUD is bolted in, the cover just clips over it using the hud to force the tabs outand locking it to the hole in the dash. To cut up a non-HUD dash to fit the HUD you have to make 2 templates, one for the foam/vinyl top of the dash, and a smaller one for the solid plastic framework. 4 holes then have to be drilled, 3 for the clip/nuts and one for an alignment pin. After that everything should clip right back in.
Dash as assembled from the factory:
Cover removed:

HUD removed:
Close up of the holes:
Hope this helps everyone who needs to replace a cracked HUD dash with a non-HUD.
I removed my dashboard this evening using the directions found on NICO, but this forum wont let me link to them. Thanks to MrZabala and NICO for thier tech section. Currently my interior looks like this:
Here is what I've figured out about the HUD system. The dash is cut all the way through with metal threaded clip nuts (dont know the real name) that allow the HUD to bolt to. Once the HUD is bolted in, the cover just clips over it using the hud to force the tabs outand locking it to the hole in the dash. To cut up a non-HUD dash to fit the HUD you have to make 2 templates, one for the foam/vinyl top of the dash, and a smaller one for the solid plastic framework. 4 holes then have to be drilled, 3 for the clip/nuts and one for an alignment pin. After that everything should clip right back in.
Dash as assembled from the factory:
Cover removed:
HUD removed:
Close up of the holes:
Hope this helps everyone who needs to replace a cracked HUD dash with a non-HUD.
Last edited by Lord Umoja; 11-27-2008 at 07:25 PM.
 11-29-2008, 12:44 PM
#2
Registered User
Thread Starter
Join Date: Aug 2008
Location: Red Lion PA
Posts: 353
So here is the semi-How-to for this project. Disclaimer: I am not liable for any damages/injuries that may result from use of these directions. Modify your dash at your own risk.
First of all ths project is FAR easier if you have a HUD dash in your possession. I dont reccomend turing a Non-HUD car into a HUD car as the windshield on the HUD cars has a reflective section for the HUD to display in. If you really want to add a HUD you will have to figure out this issue on your own. The top template for cutting through the foam is a 3-D shape and becomes warped if you try to lay it flat. It is also far easier to locate the hole if you have a dash to copy from. If you have a friend with a HUD just have them remove the trim cover and get your shape from that.
Tool/Items needed:
Replacement Dash
HUD and related parts (Blind nuts, trim cover)
Stock HUD Dash (see above)
Sharpie
Cardstock
Clear Duct Tape
Xacto Knife (#11 Blade)
Sharp Scraping Tool
Dremmel Tool with Sanding drum and side cutting bit.
Electric Drill (I'll update with sizes later)
Time Required: Depending on skill, about an hour.
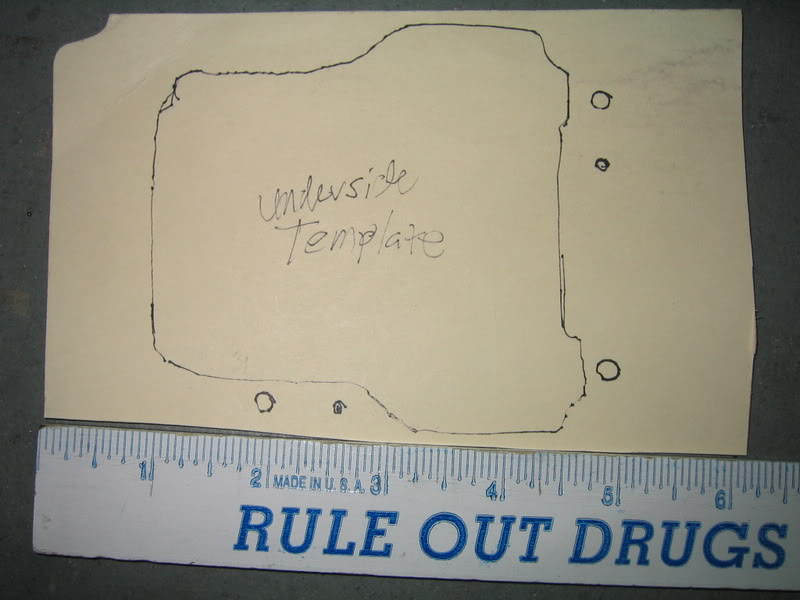
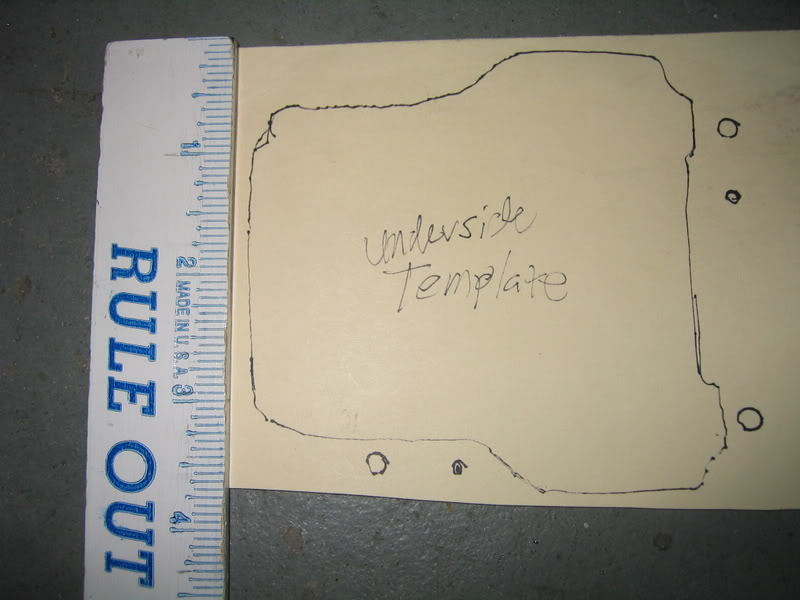
Step 1 is to make your templates. You will need a top template for cutting through the vinyl and foam top, as well as a bottom template for cutting through the actual plastic of the dash.
I made my bottom template from card stock held in the hole for the hud from underneath. You can try to print this and match the ruler size but I make NO gurantees.
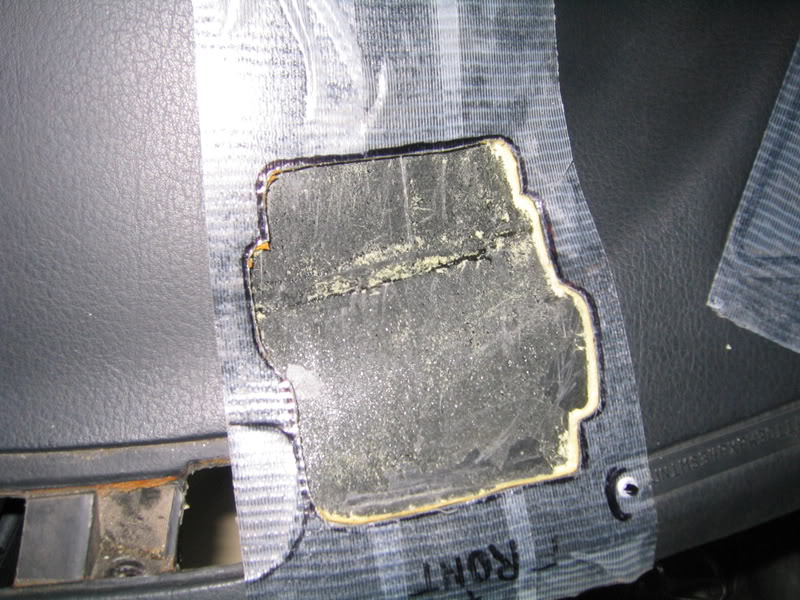
I fabricated my top template from clear duct tape. I tried to use blue or green painter's tape but found it didn't sitck to the dash at all. I layered tape over the hole and then drew the outline of the hole with a sharpie. I drew just OUTSIDE the hole to keep accuracy. For location marks I trimed the tape to the front of the dash, as well as marking the outlines of the VIN depression, a rivet in the VIN tag, and the outline of the defroster vent. Picture below is of the template already transfered to the Non-Hud dash.
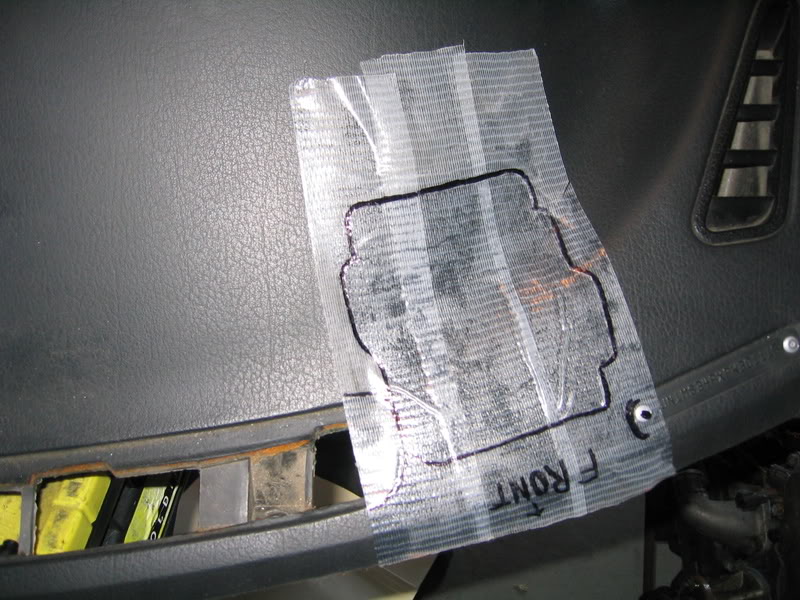
Step 2 is to transfer your top template over to the Non-HUD dash. Take your time to align this template as close as you can get to the cues you marked. The alignment is critical to get the HUD to reflect in the silvered section of the windshield. The picture above is after the template has been transfered over.
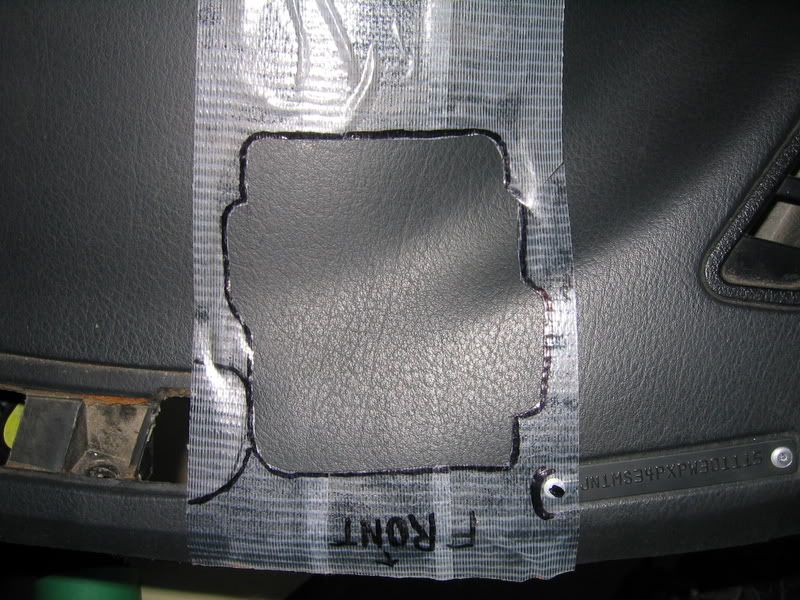
Step 3 involves cutting along the line of the top template with the Xacto knife. It will take multiple passes to get through the vinly and foam. DO NOT CUT THROUGH THE PLASTIC UNDERNEATH. GO SLOWLY, it is better to take time now than have to fix a mistake later. I cut just INSIDE my line to keep the factory size as close as I could. When you finish and are through the vinyl and foam, you can remove the center section of your template.
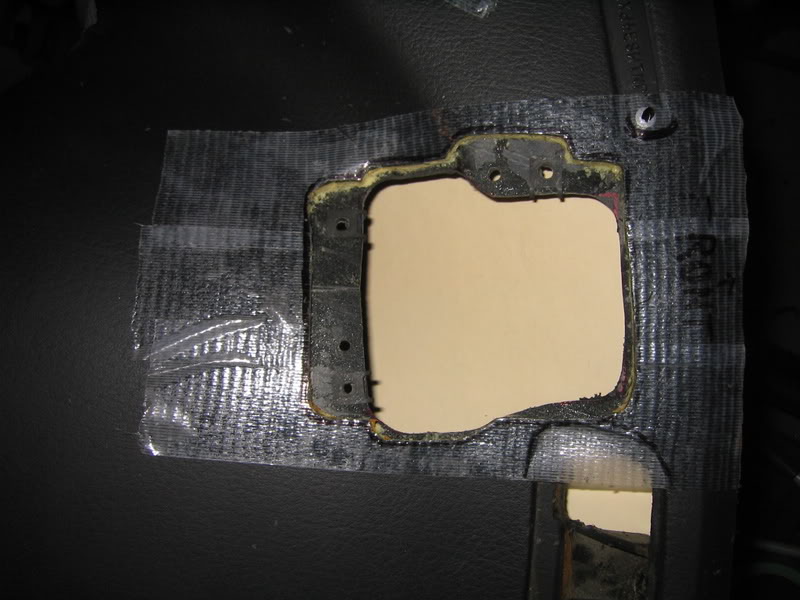
Step 4. Using your fingers, a chisel, or some other object, CAREFULLY peel up the vinyl and foam inside the template. If it looks like parts are still connected, go over the line with your knife again to free them. After the vinly is off use a scraping too to remove the foam. I used a set of sharp wood working chisels for this process. When it is done it should look like this:
First of all ths project is FAR easier if you have a HUD dash in your possession. I dont reccomend turing a Non-HUD car into a HUD car as the windshield on the HUD cars has a reflective section for the HUD to display in. If you really want to add a HUD you will have to figure out this issue on your own. The top template for cutting through the foam is a 3-D shape and becomes warped if you try to lay it flat. It is also far easier to locate the hole if you have a dash to copy from. If you have a friend with a HUD just have them remove the trim cover and get your shape from that.
Tool/Items needed:
Replacement Dash
HUD and related parts (Blind nuts, trim cover)
Stock HUD Dash (see above)
Sharpie
Cardstock
Clear Duct Tape
Xacto Knife (#11 Blade)
Sharp Scraping Tool
Dremmel Tool with Sanding drum and side cutting bit.
Electric Drill (I'll update with sizes later)
Time Required: Depending on skill, about an hour.
Step 1 is to make your templates. You will need a top template for cutting through the vinyl and foam top, as well as a bottom template for cutting through the actual plastic of the dash.
I made my bottom template from card stock held in the hole for the hud from underneath. You can try to print this and match the ruler size but I make NO gurantees.
I fabricated my top template from clear duct tape. I tried to use blue or green painter's tape but found it didn't sitck to the dash at all. I layered tape over the hole and then drew the outline of the hole with a sharpie. I drew just OUTSIDE the hole to keep accuracy. For location marks I trimed the tape to the front of the dash, as well as marking the outlines of the VIN depression, a rivet in the VIN tag, and the outline of the defroster vent. Picture below is of the template already transfered to the Non-Hud dash.
Step 2 is to transfer your top template over to the Non-HUD dash. Take your time to align this template as close as you can get to the cues you marked. The alignment is critical to get the HUD to reflect in the silvered section of the windshield. The picture above is after the template has been transfered over.
Step 3 involves cutting along the line of the top template with the Xacto knife. It will take multiple passes to get through the vinly and foam. DO NOT CUT THROUGH THE PLASTIC UNDERNEATH. GO SLOWLY, it is better to take time now than have to fix a mistake later. I cut just INSIDE my line to keep the factory size as close as I could. When you finish and are through the vinyl and foam, you can remove the center section of your template.
Step 4. Using your fingers, a chisel, or some other object, CAREFULLY peel up the vinyl and foam inside the template. If it looks like parts are still connected, go over the line with your knife again to free them. After the vinly is off use a scraping too to remove the foam. I used a set of sharp wood working chisels for this process. When it is done it should look like this:
11-29-2008, 12:59 PM
#3
Registered User
Thread Starter
Join Date: Aug 2008
Location: Red Lion PA
Posts: 353
Step 5 Trim your bottom template and place it in the opening. Mark the borders with a sharpie and prepare to cut. Mark your hole locations now and then trim the template until you can mark all the way around the opening.
Step 6 Cut inside the marked section with the dremmel tool and side cutting bit. You want to leave extra material inside to be removed with the sanding drum. Once a majority of the material is removed, switch to the sanding drum and fine tune the opeining. This hole is for the body of the HUD to drop through.
Step 7 Drill your 3 mounting holes for the blind nuts AND the two holes for the alignment pins. Use the full bottom template to locate them, double checking with the actual HUD for fine tuning.
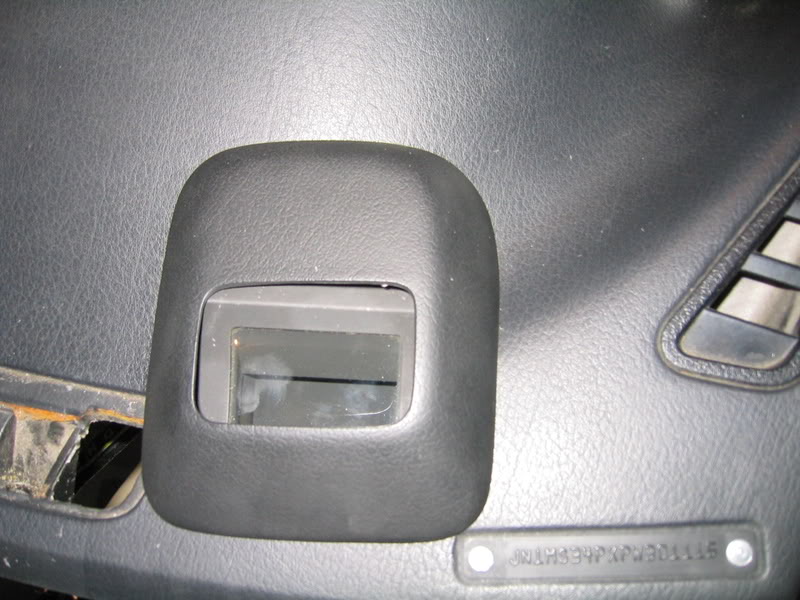
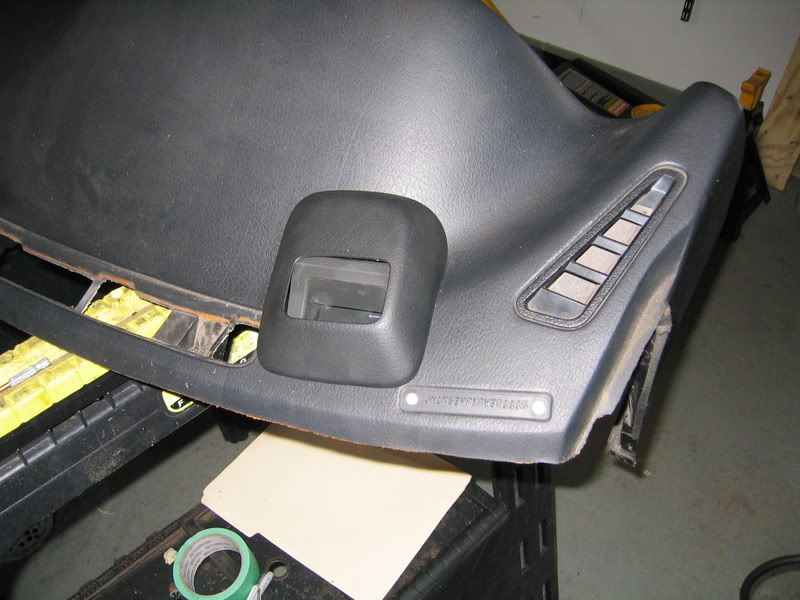
Step 8 Assemble the HUD by locking the blind nuts over the proper holes, bolting in the HUD, and snapping the trim cover over the whole thing. Sit back and enjoy the fruits of your labor. Should look like this when done:
I hope this helps anyone trying to replace a cracked up dash in a HUD equipped car, If you have any questions about the process please feel free to PM me or hit me up on AIM.
---Matt
Step 6 Cut inside the marked section with the dremmel tool and side cutting bit. You want to leave extra material inside to be removed with the sanding drum. Once a majority of the material is removed, switch to the sanding drum and fine tune the opeining. This hole is for the body of the HUD to drop through.
Step 7 Drill your 3 mounting holes for the blind nuts AND the two holes for the alignment pins. Use the full bottom template to locate them, double checking with the actual HUD for fine tuning.
Step 8 Assemble the HUD by locking the blind nuts over the proper holes, bolting in the HUD, and snapping the trim cover over the whole thing. Sit back and enjoy the fruits of your labor. Should look like this when done:
I hope this helps anyone trying to replace a cracked up dash in a HUD equipped car, If you have any questions about the process please feel free to PM me or hit me up on AIM.
---Matt
 06-26-2009, 02:46 PM
#6
Registered User
Thread Starter
Join Date: Aug 2008
Location: Red Lion PA
Posts: 353


Thread
Thread Starter
Forum
Replies
Last Post
RPS13KA-T
For Sale - Interior / Exterior / Sound / Styling
6
09-11-2007 01:14 PM
revolutionz_s13
For Sale - Wanting To Buy (WTB) Or Trade (WTT)
1
03-25-2007 11:21 PM
silver240esex
Private For Sale / Wanted
6
06-01-2006 11:17 PM