
DIY 350Z Brakes on S14

Thread Starter
Contributing Member
Joined: Jul 2008
Posts: 1,152
From: Cleveland Ohio
DIY 350Z Brakes on S14
I just recently installed 350Z track Calipers and Rotors on a 95 240SX. The pictures are small untill I get the full size ones from my friend. The installation process was extremely easy. The only fabrication involved is cutting the heat shield to allow the bigger rotor and calipers to fit. The stock lines and bolts were used. This swap took aprox. 2 hours from start to finish.
Things you will need.
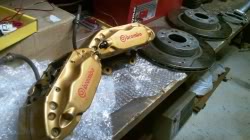
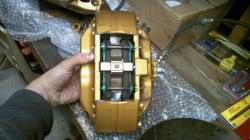
1. 350Z Track Calipers and pads
2. 350Z Track Rotors
3. 19mm wrench
4. 12mm wrench
5. 11mm wrench
6. preferably a cutting wheel on a pneumatic die grinder
7. brake fluid
8. Jack and jack stands
9. someone to help bleed the brakes
I forgot to take pictures before hand of removing the brakes. If you dont know how to remove brakes, perhaps you shouldnt be doing this swap anyways.
Step 1 Removing old brakes
(Assuming you already have the front on the car in the air and the wheels removed)
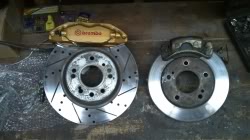
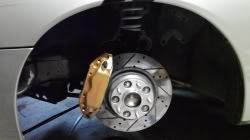
I broke the banjo bolt loose on the caliper before starting any work but tightened it down just enough so that it didnt leak. You dont want to remove this yet unless you feel like bleeding the entire brake system. The banjo bolts are 12mm. Then next I removed the 2 19mm caliper bracket bolts from each side and pulled the caliper assembly off to the side and secured it to the sway bar with a bungee cord to keep the tension off the flex line. Next I pulled the rotor off to the side and took some comparison shots of old and new.
Take note that there are 2 bleeders on EACH caliper.
Step 2 - Cutting the heat shield
The lip needs to be removed on the heat shield to fit the new rotor. I also removed some material near the caliper to allow clearance for the massive calipers. I used a cutting wheel on my pneumatic die grinder to do all the cutting. It took about 5 minutes per side.
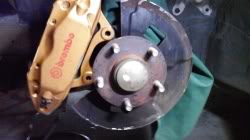
Step 3 - Install new parts
Slide the new huge rotors on and bolt the calipers to the hub using the Stock S14 caliper bracket bolts. Now make sure there is plenty of brake fluid in the master cylinder because you will be losing a little bit. Now unbolt the stock flex lines from the stock caliper assembly and bolt them to the 350Z calipers using the stock hardware.
Step back for a minute and enjoy the new sexiness
Step 4 - Bleed brakes
I hope you guys know the process for bleeding brakes. Start with the passenger side first. Make sure the master is full before starting the bleeding process.
I mentioned earlier that there are 2 bleeders on EACH caliper. You want to start with the inner bleeder first then bleed the outer second. Repeat for the drivers side. The bleeders are 11mm.
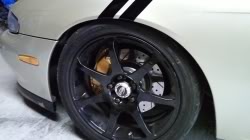
You will need 17" wheels to clear these massive brakes. So install your 17"+ wheels and go enjoy some awesome braking power. This swap was done using the stock master cylinder and the brakes are actually more responsive than the stock ones.
Things you will need.
1. 350Z Track Calipers and pads
2. 350Z Track Rotors
3. 19mm wrench
4. 12mm wrench
5. 11mm wrench
6. preferably a cutting wheel on a pneumatic die grinder
7. brake fluid
8. Jack and jack stands
9. someone to help bleed the brakes
I forgot to take pictures before hand of removing the brakes. If you dont know how to remove brakes, perhaps you shouldnt be doing this swap anyways.
Step 1 Removing old brakes
(Assuming you already have the front on the car in the air and the wheels removed)
I broke the banjo bolt loose on the caliper before starting any work but tightened it down just enough so that it didnt leak. You dont want to remove this yet unless you feel like bleeding the entire brake system. The banjo bolts are 12mm. Then next I removed the 2 19mm caliper bracket bolts from each side and pulled the caliper assembly off to the side and secured it to the sway bar with a bungee cord to keep the tension off the flex line. Next I pulled the rotor off to the side and took some comparison shots of old and new.
Take note that there are 2 bleeders on EACH caliper.
Step 2 - Cutting the heat shield
The lip needs to be removed on the heat shield to fit the new rotor. I also removed some material near the caliper to allow clearance for the massive calipers. I used a cutting wheel on my pneumatic die grinder to do all the cutting. It took about 5 minutes per side.
Step 3 - Install new parts
Slide the new huge rotors on and bolt the calipers to the hub using the Stock S14 caliper bracket bolts. Now make sure there is plenty of brake fluid in the master cylinder because you will be losing a little bit. Now unbolt the stock flex lines from the stock caliper assembly and bolt them to the 350Z calipers using the stock hardware.
Step back for a minute and enjoy the new sexiness
Step 4 - Bleed brakes
I hope you guys know the process for bleeding brakes. Start with the passenger side first. Make sure the master is full before starting the bleeding process.
I mentioned earlier that there are 2 bleeders on EACH caliper. You want to start with the inner bleeder first then bleed the outer second. Repeat for the drivers side. The bleeders are 11mm.
You will need 17" wheels to clear these massive brakes. So install your 17"+ wheels and go enjoy some awesome braking power. This swap was done using the stock master cylinder and the brakes are actually more responsive than the stock ones.
its the same exact process as installing 300zx brakes.. the Brembos from the Z33 are the same brakes that came in the r32 vspec GTR , r33 GTR and r34 GTR so yea they do bolt right up to a 240 yay nissan cookie cutter technology!


Thread Starter
Contributing Member
Joined: Jul 2008
Posts: 1,152
From: Cleveland Ohio
Rear brakes are staying stock for now. Not sure about the BMC at this point. Currently the brakes are amazing and nothing really needs changed yet. If the rears get swapped, then the BMC will be.


Thread
Thread Starter
Forum
Replies
Last Post
mad-ass
How Tos / Installations
19
Aug 26, 2011 11:06 AM
ErizSR
Suspension, Chassis, and Brakes
1
Jan 19, 2010 07:26 PM
FuriousZ
Suspension, Chassis, and Brakes
6
Apr 20, 2009 05:56 PM