
Short and Sweet updates: Enrique's 92 Coupe SR

HERE IS THE STORY!
Today I am going to start this thread. I will not complete it but will post some pics. (TAKES FOR EVER!! This is my first time uploading to a website to host on here, lets see how it goes!)
I have two coupes:
1. Daily driver: RED 93 240sx SE 5spd KA24DE Black interior. Everything stock, everything works, nice stereo, VERY COMFORTABLE! Some dings here and there, but original paint. AND slow�
a. SOME THINGS TO DO/HAVE DONE:
i. I have installed polyurethane bushings all around suspension.
The car feels a lot more stable, turns better, is stiffer. A+.


ii. Aligned,
iii. Will eventually lower it, but it�s not in my primary to do list. It�s my DD, lots of dips where I live. later will probably lower with coilovers! (later)
iv. I have re upholstered the beat up OEM seats from my other coupe, and they look, and feel AWESOME! added extra cushions to give it a more sporty look and FEEL. Overall feel like brand new aftermarket seats! Also the reupholstered the rear seats to match.


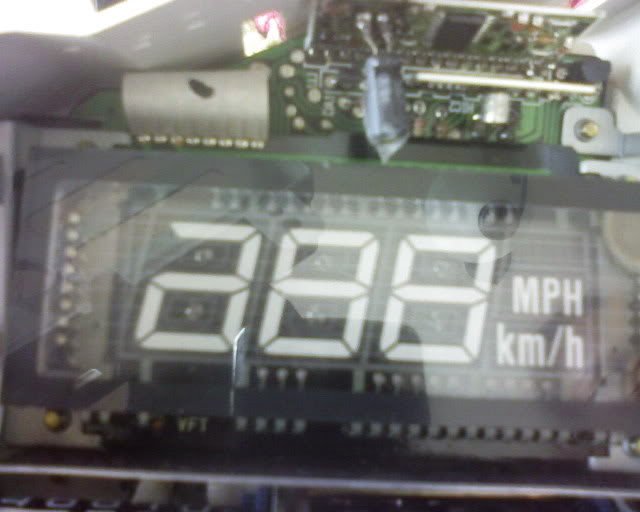
yesterday (june 16), i fixed the HUD speedometer:
TEARED it apart!

dropped the steering column:

messy:

Cluster in:

Cluster out:

and in two minutes it was completely apart:

i tested it the way the "website" said to do, by heating the capacitor up
and seeing if it charges, but not luck. it didn't work.
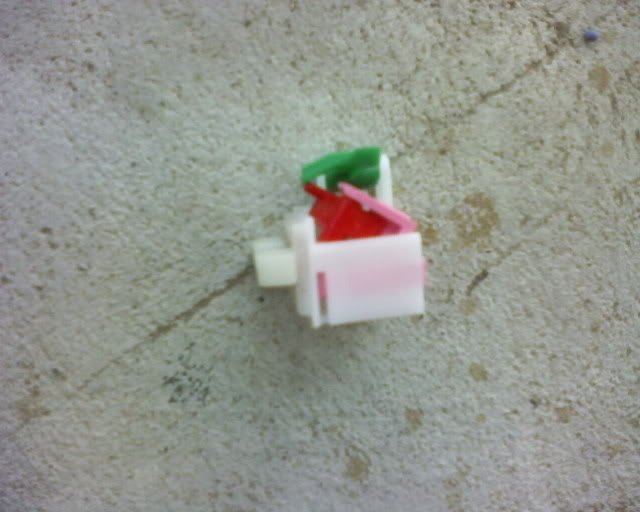
So i decided to take apart my 92 SR coupe's out and compare them:

turns out that the SR had been FIXED. It had a capacitor. so I saw what I had
to do to my other HUD.
The small capacitor, (can looking thing) on the top is the bad one.
Try and check it out in these pictures.
i know the pictures are blurry and ugly but its a cell phone picture and the
part is really small.here are the pictures:
BAD 93 COUPE'S

GOOD "ALREADY FIXED" ON 92 COUPE:

GOOD- THE ONE I FIXED MYSELF AFTER HOURS OF HEADACHES AND REAPTED ATTEMPTS TO SOLDER:
2. Project Car: Little street racer, GOLD 92 240sx SE auto -> 5spd SR20DET red top. I want it to be quick and light and reliable, not necessary comfortable, but decent. It has/had a BROWN ? interior.
Here are some pictures of what the car looked like a before I started.


Today I am going to start this thread. I will not complete it but will post some pics. (TAKES FOR EVER!! This is my first time uploading to a website to host on here, lets see how it goes!)
I have two coupes:
1. Daily driver: RED 93 240sx SE 5spd KA24DE Black interior. Everything stock, everything works, nice stereo, VERY COMFORTABLE! Some dings here and there, but original paint. AND slow�
a. SOME THINGS TO DO/HAVE DONE:
i. I have installed polyurethane bushings all around suspension.
The car feels a lot more stable, turns better, is stiffer. A+.
ii. Aligned,
iii. Will eventually lower it, but it�s not in my primary to do list. It�s my DD, lots of dips where I live. later will probably lower with coilovers! (later)
iv. I have re upholstered the beat up OEM seats from my other coupe, and they look, and feel AWESOME! added extra cushions to give it a more sporty look and FEEL. Overall feel like brand new aftermarket seats! Also the reupholstered the rear seats to match.
yesterday (june 16), i fixed the HUD speedometer:
TEARED it apart!
dropped the steering column:
messy:
Cluster in:
Cluster out:
and in two minutes it was completely apart:
i tested it the way the "website" said to do, by heating the capacitor up
and seeing if it charges, but not luck. it didn't work.
So i decided to take apart my 92 SR coupe's out and compare them:
turns out that the SR had been FIXED. It had a capacitor. so I saw what I had
to do to my other HUD.
The small capacitor, (can looking thing) on the top is the bad one.
Try and check it out in these pictures.
i know the pictures are blurry and ugly but its a cell phone picture and the
part is really small.here are the pictures:
BAD 93 COUPE'S
GOOD "ALREADY FIXED" ON 92 COUPE:
GOOD- THE ONE I FIXED MYSELF AFTER HOURS OF HEADACHES AND REAPTED ATTEMPTS TO SOLDER:
2. Project Car: Little street racer, GOLD 92 240sx SE auto -> 5spd SR20DET red top. I want it to be quick and light and reliable, not necessary comfortable, but decent. It has/had a BROWN ? interior.
Here are some pictures of what the car looked like a before I started.
Last edited by FuriousZ; Jun 18, 2008 at 11:25 AM. Reason: ADDED MORE DETAIL AND AN INTRO SORT OF

a. SOME THINGS TO DO:
i. Change interior to BLACK from brown.
************************************************** **************
So, I don�t like the brown interior, I decide to change it to black. So I am broke and can�t afford a full interior. Decide to spray paint it black. The dash had some cracks, before that I decide to fix them.
First time I remove the dash board and stuff.


Looked like this before:


First time I ever use bondo, body filler, decide to buy it and try it and see if it works.


I was amazed at how that thing works. It is easy to shape, and use. I used it to fill in all the cracks after sanding. I repeated that like 3-4 times.
I spray paint it with a black primer, let dry, then coat it and sand it like 3-4 times.
Turned out like this:

Actually a little better than that, I think that was the first or second coat.
And then it went back on the car! Like this:


Then I painted the center console, turned out like this: (partly put back)

Then I painted the the doors and installed them. compare to the pictures above with the dashboard installed and doors unpainted!!!


For the glove compartment I wanted to remove the fabric and hope there was a black plastic underneath but no luck.
Took it apart, and found that under the brown fabric there was a yellow glue that was hard to remove. I decided to spray painted.
Turned out good, BETTER than BROWN!
It looks like black fabrick. I would recommend anyone swithcing the brown to black interior to do this!
and of coarse paint the brown handle!

I started priming and painting all the other peices.
It took me two full days to take interior out paint the dash, doors remove a/c heater blower, organize cables and other stuff.
on the second day I went to the store to buy MORE paint and was quite shocked when I saw this exit with me off the high way!

CAN ANYONE RECOGNIZE WHAT IT IS? ? ? ? ? ? ? ?
CAN ANYONE RECOGNIZE WHAT IT IS? ? ? ? ? ? ? ?
Lets go on...
THen on the third day I decide to stop at my community junk yard and see if I can find any peices because I am SICK OF PAINTING!
LUCKY ME ! ! ! !
They had just gotten a COUPE!
everything else they've always had are hatchbacks! and 1 convertible! ! !
AND THE INTERIOR WAS BLACK!
So I jumped on a deal. The car was still fresh.
not rotten from sitting out in the junkyard for years and stuff!
I was so pumped!
This car was an 89 coupe hit from the front.
No sunroof, so some of the peices were a little different. mainly the a pillars.
I got a great deal! bought all this! for 135 dlls!
The lip I got at a different junkyard for 15dlls from a pignose. a little bit up but will try to put on.
Does anyone know if it works on an 91-94 front OEM bumper???

The door panels were clean and perfect.

I also got the plastics for the seats because I had tan ones from the tan car, I was going to paint them black!

Then I went back to get the rear speaker grill with carpeting for the back. I didn't have one in the car!
Will probably re upholster it and remove the grills and a brake light gap in the center.
************************************************** **************
ii. Replace tan carpet with black carpet.
iii. Replace tan ceiling top with black one.
iv. Remove rear seat.
************************************************** **************
These are the seats from my other coupe, They are clean with no tears. They are going into this EX tan colored coupe. Minus the rear.

This is the back of the car before removing too much.

Then this is what it looked like after removing the tar sound deadening material from back
(SORRY FOR BAD PICTURES most are from cell phone in bright daylight)

Then we, my girl and I cut some extra tough, (I don�t know what it is called) compressed cardboard, I mean it its even really tough to cut.
And made this:

Painted it:

Installed it:
I t will have carpet over it when I install custom black carpet on the car:

************************************************** **************
v. Replace automatic seatbelts with manual seat belts. (WILL WRITE A HOW TO)
PS PS PS : The car is a skyline!
Here is a better picture!

I got to touch it!

They were also hauling these two other cars. pretty nice!

but the RHD skyline MADE MY DAY!!!!!
i. Change interior to BLACK from brown.
************************************************** **************
So, I don�t like the brown interior, I decide to change it to black. So I am broke and can�t afford a full interior. Decide to spray paint it black. The dash had some cracks, before that I decide to fix them.
First time I remove the dash board and stuff.
Looked like this before:
First time I ever use bondo, body filler, decide to buy it and try it and see if it works.
I was amazed at how that thing works. It is easy to shape, and use. I used it to fill in all the cracks after sanding. I repeated that like 3-4 times.
I spray paint it with a black primer, let dry, then coat it and sand it like 3-4 times.
Turned out like this:
Actually a little better than that, I think that was the first or second coat.
And then it went back on the car! Like this:
Then I painted the center console, turned out like this: (partly put back)
Then I painted the the doors and installed them. compare to the pictures above with the dashboard installed and doors unpainted!!!
For the glove compartment I wanted to remove the fabric and hope there was a black plastic underneath but no luck.
Took it apart, and found that under the brown fabric there was a yellow glue that was hard to remove. I decided to spray painted.
Turned out good, BETTER than BROWN!
It looks like black fabrick. I would recommend anyone swithcing the brown to black interior to do this!
and of coarse paint the brown handle!
I started priming and painting all the other peices.
It took me two full days to take interior out paint the dash, doors remove a/c heater blower, organize cables and other stuff.
on the second day I went to the store to buy MORE paint and was quite shocked when I saw this exit with me off the high way!
CAN ANYONE RECOGNIZE WHAT IT IS? ? ? ? ? ? ? ?
CAN ANYONE RECOGNIZE WHAT IT IS? ? ? ? ? ? ? ?
Lets go on...
THen on the third day I decide to stop at my community junk yard and see if I can find any peices because I am SICK OF PAINTING!
LUCKY ME ! ! ! !
They had just gotten a COUPE!
everything else they've always had are hatchbacks! and 1 convertible! ! !
AND THE INTERIOR WAS BLACK!
So I jumped on a deal. The car was still fresh.
not rotten from sitting out in the junkyard for years and stuff!
I was so pumped!
This car was an 89 coupe hit from the front.
No sunroof, so some of the peices were a little different. mainly the a pillars.
I got a great deal! bought all this! for 135 dlls!
The lip I got at a different junkyard for 15dlls from a pignose. a little bit up but will try to put on.
Does anyone know if it works on an 91-94 front OEM bumper???
The door panels were clean and perfect.
I also got the plastics for the seats because I had tan ones from the tan car, I was going to paint them black!
Then I went back to get the rear speaker grill with carpeting for the back. I didn't have one in the car!
Will probably re upholster it and remove the grills and a brake light gap in the center.
************************************************** **************
ii. Replace tan carpet with black carpet.
iii. Replace tan ceiling top with black one.
iv. Remove rear seat.
************************************************** **************
These are the seats from my other coupe, They are clean with no tears. They are going into this EX tan colored coupe. Minus the rear.
This is the back of the car before removing too much.
Then this is what it looked like after removing the tar sound deadening material from back
(SORRY FOR BAD PICTURES most are from cell phone in bright daylight)
Then we, my girl and I cut some extra tough, (I don�t know what it is called) compressed cardboard, I mean it its even really tough to cut.
And made this:
Painted it:
Installed it:
I t will have carpet over it when I install custom black carpet on the car:
************************************************** **************
v. Replace automatic seatbelts with manual seat belts. (WILL WRITE A HOW TO)
PS PS PS : The car is a skyline!
Here is a better picture!
I got to touch it!
They were also hauling these two other cars. pretty nice!
but the RHD skyline MADE MY DAY!!!!!
Last edited by FuriousZ; Jun 6, 2008 at 10:56 AM. Reason: LAST EDITED ON JUNE 6th
vi. REMOVE WEIGHT:
************************************************** **************
Sound deadening tar,
(used dry ice, Not as easy as I thought, had to use lots of elbow grease and chisel and hammer!)


all padding under plastic trim pieces, all padding under carpet,
Stereo, speakers,
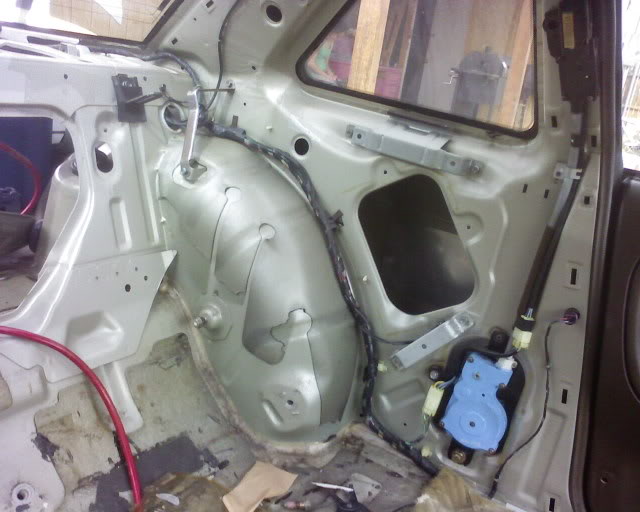
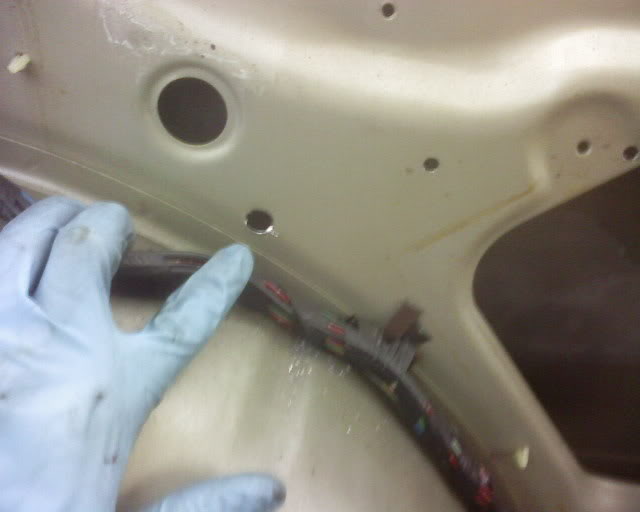
Here, i removed the compartment on the door, and the speaker and amplifier that was inside.


Power antenna,

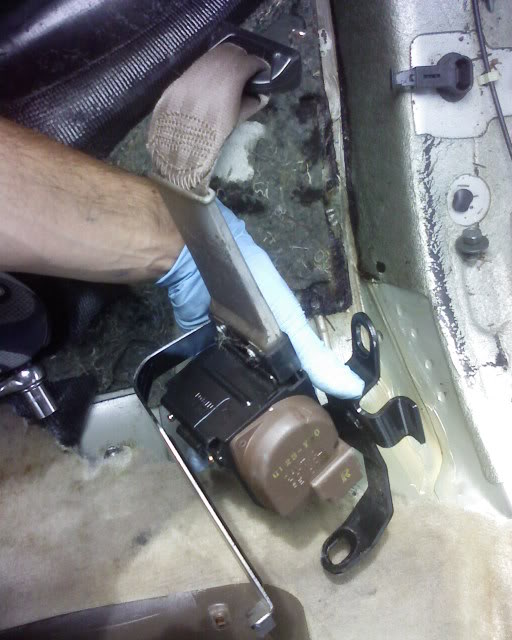
Automatic seat belts (they weigh so much! ! ! you’ll be surprised.)
I want to weigh them and see how much, Might do that later before I throw them away.

A/C compressor, condenser, evaporator,

Heater,

Blower,

All air ducts under dashboard,

spare tire, all plastics in the trunk and metal brackets (that hold the Jack), rear seat, anything else that I see fit to remove (while keeping the car looking DECENT!)
************************************************** **************
vii. Organize the ECU cables under dash board,
************************************************** **************
They used to be like this

And also like this (after removing A/C , heating and ducts from under dash

But I organized them a little bit.


************************************************** **************
viii. RELOCATE: the boost gauge, turbo timer, AFC, Boost controllers.
************************************************** **************
This is where the boost gague and turbo timer were.

These are the AFC and boost controllers

This is where I want the boost gauge and turbo timer, and a switch for an electric fan to be:

This is where I wanted to mount the gauges, on the plastic and drill holes on this compressed cardboard:

But couldn’t because of clearance. The cardboard is about a � of an inch or a little less and it doesn’t fit right if mounted on top of the black plastic. The black plastic used to be a stereo mounting kit. But I cut it to make space in the center.
I couldn’t use the black stereo mounting kit so I had to attach the cardboard directly on the bezel.
Like this:

And looks like this on the car (not fully installed)
With the AFC and boost controller in the glove compartment

************************************************** **************
ix. Might reupholster the front seats but, I might keep them for a while. Right now I have the OEM black seats from my other coupe.
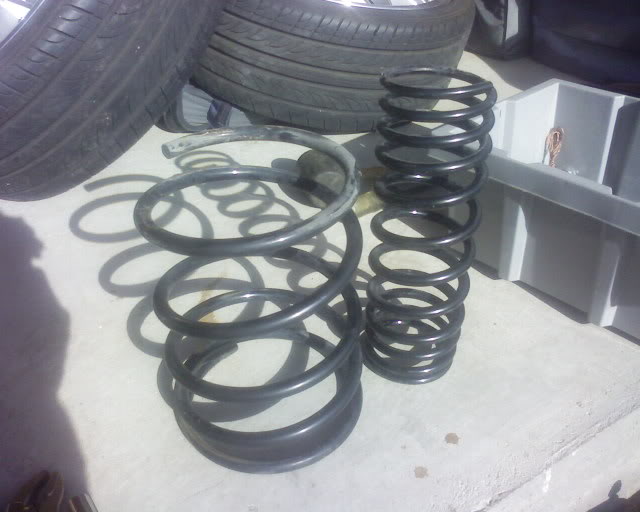
x. I have RSR down springs (not installed in pictures) that need shocks. Will be replacing the shocks.
************************************************** **************
Installed these, kyb AGX, 3 days ago:

with these RS-R Down springs:
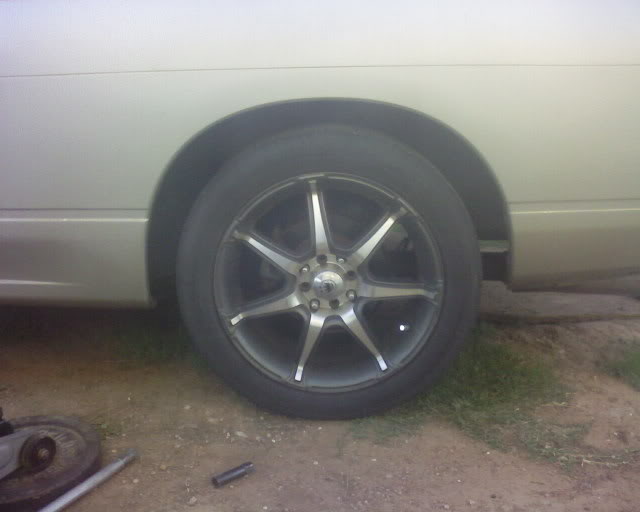
And switch wheels with my other car:

on the before and after pictures there won't be a drastic change in the "gap"
because the wheels that were on it before where taller as you can see here:

KEEP ^ IN MIND!
here is some old strut/shocks with old springs:


the installation:


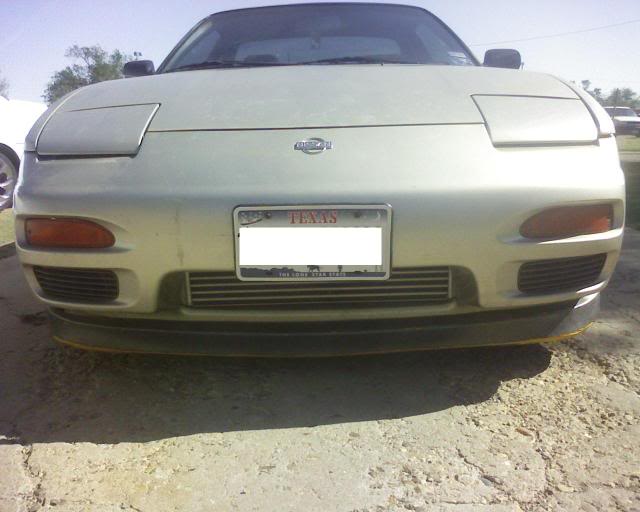
BEFORE FRONT SPRINGS STRUTS INTALLATION:

AFTER FRONT SPRINGS STRUTS INSTALLATION:

Remember the other side is not done yet and the back so after it was all complete
it sitted a little lower.

BEFORE DROPPING THE BACK:
IT was dark when I finished:

At the same time I installed the pignose lip:
Zip ties!
This is the next morning.
Lowered and front lip installed:


I Don't know how much spacers are but i need to buy some! i don't have money for wheels yet!
************************************************** **************
xi. Will be replacing all the suspension bushings with polyurethane kit.
xii. Align the car.
xiii. Will add strut bars to stabilize it.
xiv. Might paint the car if possible. (Two colors, original gold bottom, and will be painted black on top, because I don’t want to paint the door jams and engine bay.)
PS I don’t have much money so remember all this is done on a tight budget.
So I can’t afford coilovers, light weight wheels with good offset, Carbon fiber parts, or huge turbos.
j/k!
************************************************** **************
Sound deadening tar,
(used dry ice, Not as easy as I thought, had to use lots of elbow grease and chisel and hammer!)
all padding under plastic trim pieces, all padding under carpet,
Stereo, speakers,
Here, i removed the compartment on the door, and the speaker and amplifier that was inside.
Power antenna,
Automatic seat belts (they weigh so much! ! ! you’ll be surprised.)
I want to weigh them and see how much, Might do that later before I throw them away.
A/C compressor, condenser, evaporator,
Heater,
Blower,
All air ducts under dashboard,
spare tire, all plastics in the trunk and metal brackets (that hold the Jack), rear seat, anything else that I see fit to remove (while keeping the car looking DECENT!)
************************************************** **************
vii. Organize the ECU cables under dash board,
************************************************** **************
They used to be like this
And also like this (after removing A/C , heating and ducts from under dash
But I organized them a little bit.
************************************************** **************
viii. RELOCATE: the boost gauge, turbo timer, AFC, Boost controllers.
************************************************** **************
This is where the boost gague and turbo timer were.
These are the AFC and boost controllers
This is where I want the boost gauge and turbo timer, and a switch for an electric fan to be:
This is where I wanted to mount the gauges, on the plastic and drill holes on this compressed cardboard:
But couldn’t because of clearance. The cardboard is about a � of an inch or a little less and it doesn’t fit right if mounted on top of the black plastic. The black plastic used to be a stereo mounting kit. But I cut it to make space in the center.
I couldn’t use the black stereo mounting kit so I had to attach the cardboard directly on the bezel.
Like this:
And looks like this on the car (not fully installed)
With the AFC and boost controller in the glove compartment
************************************************** **************
ix. Might reupholster the front seats but, I might keep them for a while. Right now I have the OEM black seats from my other coupe.
x. I have RSR down springs (not installed in pictures) that need shocks. Will be replacing the shocks.
************************************************** **************
Installed these, kyb AGX, 3 days ago:
with these RS-R Down springs:
And switch wheels with my other car:
on the before and after pictures there won't be a drastic change in the "gap"
because the wheels that were on it before where taller as you can see here:
KEEP ^ IN MIND!
here is some old strut/shocks with old springs:
the installation:
BEFORE FRONT SPRINGS STRUTS INTALLATION:
AFTER FRONT SPRINGS STRUTS INSTALLATION:
Remember the other side is not done yet and the back so after it was all complete
it sitted a little lower.
BEFORE DROPPING THE BACK:
IT was dark when I finished:
At the same time I installed the pignose lip:
Zip ties!
This is the next morning.
Lowered and front lip installed:
I Don't know how much spacers are but i need to buy some! i don't have money for wheels yet!
************************************************** **************
xi. Will be replacing all the suspension bushings with polyurethane kit.
xii. Align the car.
xiii. Will add strut bars to stabilize it.
xiv. Might paint the car if possible. (Two colors, original gold bottom, and will be painted black on top, because I don’t want to paint the door jams and engine bay.)
PS I don’t have much money so remember all this is done on a tight budget.
So I can’t afford coilovers, light weight wheels with good offset, Carbon fiber parts, or huge turbos.
j/k!
Last edited by FuriousZ; Jun 18, 2008 at 10:51 AM.
FREE MANUAL SEAT BELTS AND 5 HORSEPOWER GAIN!
FREE FREE FREE FREE FREE
Manual Seat belts HOW TO:
This is a freebie for some of you.
I used the rear seat belts from my coupe!
Lost about 24 lbs of weight by removing the automatic seatbelts.
little alteration is needed. Not all coupes have the same seat belts.
I don't have a hatchback so I don't know if those work.
I'll walk you guys through what it took to do it.
this is the set up before removing the old automatic annoying seat belts.
ALL THESE CAME OUT. Weighed it and it was 22 lbs of junk. with out weighing
the computer and all the (big) bolts.
The rear seat belts stand at an angle. They were designed to work at an angle.
They have a little metal piece that holds it at an angel:
At first I wanted to keep it at an angle. Drilling a hole to hold the seat belt:

And a bigger hole for the bolt:
making it look like this. At the orginal angle:
and of coarse having to screw it on the top. There is a big bolt there that
hold down the automatic oem seatbelts.
and the other end screws in here:
where the lap seat belt went:
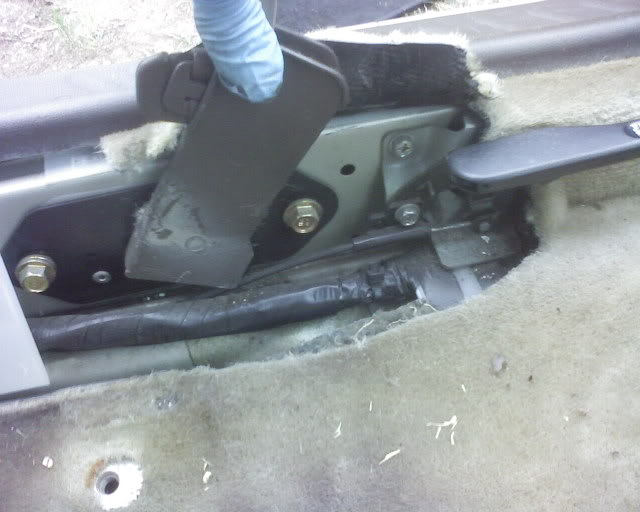
The problem is that you have to cut the rear interior quarter panel like this:


BUT it was a bad idea.
The seatbelts work fine but the interior rear quarter panel doesn't snap in
all around and would be pushed out by the bulky seat belts roller.
SO I DECIDED TO ALTER THIS:

IT CLEARLY STATES THAT IT SHOULD NOT BE OPENED.
IF YOU DON'T WANT TO ALTER IT DONT DO IT, I DID AND IT WORKED FOR ME.
this is what I did.
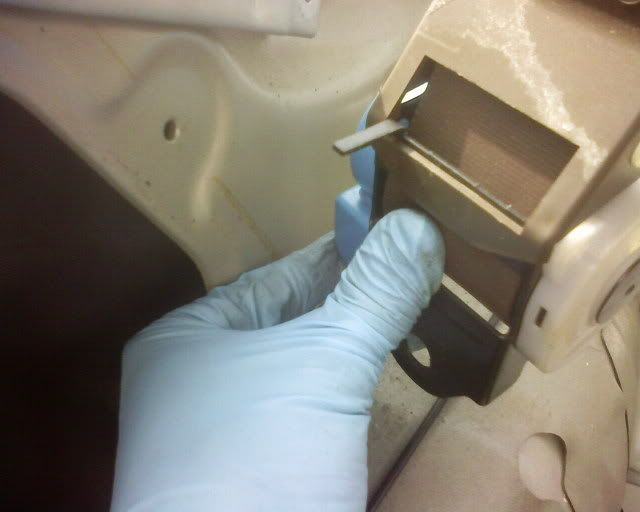
snap it open with a flat head screw driver.
study the mechanism.
this is what makes the seatbelts LOCK!
It has a little metal "barrel" looking thing that sits at an angle.
HINT HINT
when there is any movement or jerks it moves a little bit. Any little movement
locks it.
there is a little "finger" like extension that pushes the YELLOW ARM THAT LOCKS THE WHEEL.
THE FINGER LOOKING THING IS WHAT HAS TO BE ALTERED.
IF IT IS SHORTEN, THE ANGLE THAT THE SEAT BELTS HAVE TO STAND AT CHANGES A LITTLE BIT!
I used a little razor blade to shave about half of this FINGER like extension.
NOW it allows me to stand the seat belt up.
IT STILL LOCKS! IT JUST CHANGES THE SENSIBILITY AT WHICH IT LOCKS!
ANY SMALL JERK LOCKS THE WHEEL!!!
sorry for the caps but this is a very important issue.
Now you can installed them where seat belts were meant to be!
caution: when installing them, place a washer between the metal and the seatbelts
like shown in this next picture. If not, the curved part of the metal will make pressure
on the blue cap that covers the mechanism of the seat belt and that could be dangerous.
the washer gives it a little space in between with out pushing the rear interior quarter panel
out. LOOK:

NOW then can be put in like this:

and look like this when trim peices are in:
notice that no alteration was needed on the bottom trim peices. and on the top a pillar
you have to drill a hole for the top part.

This are all the pictures that I have. I might take more and post them here when I switch my brown seat
belts for black ones.
the good thing is that this is a free mod that can lighten your car by about 25 lbs!
WARNING: Don't do this if you don't want to open the seatbelts mechanism cover!
5 HP GAIN IS A JOKE, Considering you loose some weight off the car!
.
FREE FREE FREE FREE FREE
Manual Seat belts HOW TO:
This is a freebie for some of you.
I used the rear seat belts from my coupe!
Lost about 24 lbs of weight by removing the automatic seatbelts.
little alteration is needed. Not all coupes have the same seat belts.
I don't have a hatchback so I don't know if those work.
I'll walk you guys through what it took to do it.
this is the set up before removing the old automatic annoying seat belts.
ALL THESE CAME OUT. Weighed it and it was 22 lbs of junk. with out weighing
the computer and all the (big) bolts.
The rear seat belts stand at an angle. They were designed to work at an angle.
They have a little metal piece that holds it at an angel:
At first I wanted to keep it at an angle. Drilling a hole to hold the seat belt:
And a bigger hole for the bolt:
making it look like this. At the orginal angle:
and of coarse having to screw it on the top. There is a big bolt there that
hold down the automatic oem seatbelts.
and the other end screws in here:
where the lap seat belt went:
The problem is that you have to cut the rear interior quarter panel like this:
BUT it was a bad idea.
The seatbelts work fine but the interior rear quarter panel doesn't snap in
all around and would be pushed out by the bulky seat belts roller.
SO I DECIDED TO ALTER THIS:
IT CLEARLY STATES THAT IT SHOULD NOT BE OPENED.
IF YOU DON'T WANT TO ALTER IT DONT DO IT, I DID AND IT WORKED FOR ME.
this is what I did.
snap it open with a flat head screw driver.
study the mechanism.
this is what makes the seatbelts LOCK!
It has a little metal "barrel" looking thing that sits at an angle.
HINT HINT
when there is any movement or jerks it moves a little bit. Any little movement
locks it.
there is a little "finger" like extension that pushes the YELLOW ARM THAT LOCKS THE WHEEL.
THE FINGER LOOKING THING IS WHAT HAS TO BE ALTERED.
IF IT IS SHORTEN, THE ANGLE THAT THE SEAT BELTS HAVE TO STAND AT CHANGES A LITTLE BIT!
I used a little razor blade to shave about half of this FINGER like extension.
NOW it allows me to stand the seat belt up.
IT STILL LOCKS! IT JUST CHANGES THE SENSIBILITY AT WHICH IT LOCKS!
ANY SMALL JERK LOCKS THE WHEEL!!!
sorry for the caps but this is a very important issue.
Now you can installed them where seat belts were meant to be!
caution: when installing them, place a washer between the metal and the seatbelts
like shown in this next picture. If not, the curved part of the metal will make pressure
on the blue cap that covers the mechanism of the seat belt and that could be dangerous.
the washer gives it a little space in between with out pushing the rear interior quarter panel
out. LOOK:
NOW then can be put in like this:
and look like this when trim peices are in:
notice that no alteration was needed on the bottom trim peices. and on the top a pillar
you have to drill a hole for the top part.
This are all the pictures that I have. I might take more and post them here when I switch my brown seat
belts for black ones.
the good thing is that this is a free mod that can lighten your car by about 25 lbs!
WARNING: Don't do this if you don't want to open the seatbelts mechanism cover!
5 HP GAIN IS A JOKE, Considering you loose some weight off the car!
.
Last edited by FuriousZ; Jun 9, 2008 at 12:36 PM.
Yesterday, June 18, after I finished updating my thread with the AGX KYB and lowering springs
I posted that I realized that I needed spacers for the wheels.
And I still do, but I stopped at this tire shop in my neighborhood and asked for prices.
The guy sells them for $10 a piece but I bought 4 for 5 dlls a piece.

They are about 6mm or 1/4 of an inch.
And I know they don't do anything but I bought them.
Now, I am considering buying longer wheel studs and use more of these cheap spacers! ! !
But I can't find the HOW TO. ANYBODY know where it is? ill look again shortly.
Here are some before and after:


I need to buy some of those expensive 80 dlls spacers I guess!
but I am still considering longer studs!!!
I posted that I realized that I needed spacers for the wheels.
And I still do, but I stopped at this tire shop in my neighborhood and asked for prices.
The guy sells them for $10 a piece but I bought 4 for 5 dlls a piece.
They are about 6mm or 1/4 of an inch.
And I know they don't do anything but I bought them.
Now, I am considering buying longer wheel studs and use more of these cheap spacers! ! !
But I can't find the HOW TO. ANYBODY know where it is? ill look again shortly.
Here are some before and after:
I need to buy some of those expensive 80 dlls spacers I guess!
but I am still considering longer studs!!!
Last edited by FuriousZ; Jun 19, 2008 at 11:51 AM.


Good question. I considered using a spacer to clear the B pillar on the seat belts but decided I didn't need one.
Of coarse I used the longest bolt. It is on there tightly but not too tight to break the B pillar.
The seat belt holder thing can move, not freely but it moves if you move it. I also made sure that the bolt didn't turn with the seat belt holder.
There is not spacer. just empty space.
I'll post a pic of what you see through the gap (later).
Here is the picture:

If this is what you mean:

I can send it out ASAP for $15 shipped.
(if you want to add donations you are welcomed)
If this is not it, I probably already threw it out.
FOR EVERYONES INFORMATION:
I update the thread by going back and adding stuff to previous posts.
I know it doesnt show up as a newly posted post but I want to keep it organized.
I am almost done with all the upgrades that I have listed above so most of the new ones are going to be new posts and be shown as "new posts".
sorry for anyones inconvenience!
Of coarse I used the longest bolt. It is on there tightly but not too tight to break the B pillar.
The seat belt holder thing can move, not freely but it moves if you move it. I also made sure that the bolt didn't turn with the seat belt holder.
There is not spacer. just empty space.
I'll post a pic of what you see through the gap (later).
Here is the picture:
I can send it out ASAP for $15 shipped.
(if you want to add donations you are welcomed)
If this is not it, I probably already threw it out.
FOR EVERYONES INFORMATION:
I update the thread by going back and adding stuff to previous posts.
I know it doesnt show up as a newly posted post but I want to keep it organized.
I am almost done with all the upgrades that I have listed above so most of the new ones are going to be new posts and be shown as "new posts".
sorry for anyones inconvenience!
Last edited by FuriousZ; Aug 13, 2008 at 10:36 AM.
good luck with ur car brother. its good to see the mrs. workin on the car with u. shes a really nice girl. just fyi, ur old gold coupe that u sold to me made it all the way to new jersey. the only problems i had were two blown tires and it ran a lil hot. and im not a big fan of the brown interior, but i got some nice pieces as well. keep workin brother, and good luck.

Registered User
Joined: May 2008
Posts: 4
From: Bloomington,mn
Wow...sweet upgrades ....I was just wondering ,how did you get your stock seats re-upholstered because when i went to one of the better upholstery shops here in Bloomington ,Mn ,they said they couldn't do it because the seats were foam and would turn out bad . And how much did it cost ?
keep the build up too!!!!!
keep the build up too!!!!!