
please dont tell me to search lol

Thread Starter
Registered User
Joined: Jul 2004
Posts: 110
From: aurora ohio
please dont tell me to search lol
ok well i already looked through the 5+ pages of key worded topics that i was searching for,
and i have decided that i am going to start to grind down the hatch and paint it with some sort of paint.
i have never done body work before, and just wanted some examples of what kind of sand paper i should use.
also, i have an electric sander, but is it better to do it by hand or with the electric one? its not an air tool, its actually electric where you clip the sand paper on then turn it on and it just vibrates so fast it sands.
with that should i use 60 grit then move to 200 grit?
also what kind of paint.
thanks,
-slo

Registered User
Joined: Nov 2004
Posts: 292
From: michigan
dude search!!!
just kidding... when i did mine i did it by hand, sand everything down with a course paper first then i took like a metal ball end and taped down the holes then i went from inside the hatch and stuck duct tape across the holes(on the underside) then bondoed the holes let that dry... then sand those down and the hatch again with a fine sand paper gat some primer put a couple of coats on sanding out any impurities with a fine sand paper when your happy with that pick out your color spray that on it till it looks good but dont touch the paint the oil from your hands will leave wierd streaks... then clear coat it and wa...la...
just kidding... when i did mine i did it by hand, sand everything down with a course paper first then i took like a metal ball end and taped down the holes then i went from inside the hatch and stuck duct tape across the holes(on the underside) then bondoed the holes let that dry... then sand those down and the hatch again with a fine sand paper gat some primer put a couple of coats on sanding out any impurities with a fine sand paper when your happy with that pick out your color spray that on it till it looks good but dont touch the paint the oil from your hands will leave wierd streaks... then clear coat it and wa...la...
Contributing Member
Joined: Sep 2004
Posts: 999
From: knoxville tn
if you are going to do this repair on your own make sure you grind out as much of the rust as you can get too... patching a panel with rust still there will only slow down the rusting... use your sander at firsts so long as it is not a belt sander... sand everything down to bear metal where the repairs are going to be made... then with a dremel tool grind out any scale rust around the holes inside and out... get as much as possible...any bare metal needs to be sealed with a good metal sealer... once this is applied sand down the areas that are going to be repaired again... i would suggest using fiberglass as it is more durable than bondo and it wont absorb water over time... start on the inside with products such as kitty hair or tiger hair ... kind of like bondo but it uses fiberglass as reinforcement... fill the holes from the back side... if dsome of the fiberglass comes out of the hole dont worry about it as you will be sanding that down... now you dont want like a huge pile sticking out - takes too long to sand... but a little is okay... once it has dried sand down the outer surface using 180 grit sand paper... once you have it to where it is flush with the rest of the metal of the hatch change to a finer sand paper untill all the scratches are removed... use a LIGHT coat of bondo as a skim coat... then hand sand that down till the whole trunk is smooth... i cant stress how important it is that you use very little bondo... just enough to even out the repair... after the bondo has dried primer the hatch and hand sand again using 300 grit sand paper in a criss cross patern... process called cross blocking... this will reveal high and low spots in the bondo... sand until everything is perfectly smooth... then primer again and wet sand with 400 or hgher sand paper... once that is done put on a final coat of primer sealer and paint the color it is going to be...then you can color sand or not depends on you and clear coat the repair... it aint easy but it can be done... take your time and make it look as good as you want the rest of the car to look... the better the prep work the better and longer the repair will last...
Registered User
Joined: Nov 2004
Posts: 292
From: michigan
ohh yea i forgot about the rust...make sure and get that out of their...and when you do the paint spray thin coats and let it dry if not youll get runs in the paint then it looks like you dont know what your doin...:-)
Thread Starter
Registered User
Joined: Jul 2004
Posts: 110
From: aurora ohio

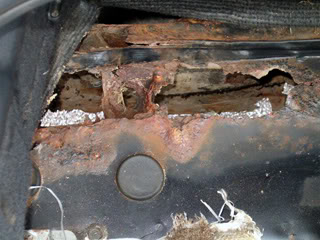
well this is what i am going to fix, not to mention the rest of the wholes that are there from the seatbelt bolts and such.
now as for the fiberglass, i would do that from the inside of the car correct? does anyone have any pictures to demonstrate
...fill the holes from the back side... if dsome of the fiberglass comes out of the hole dont worry about it as you will be sanding that down...
do you mean back side as the bottom of the car? as for that i thought you always fiberglass ontop..
either way heres the pic of what the main problem is with this.
|
|
|
|
V
Contributing Member
Joined: Sep 2004
Posts: 999
From: knoxville tn
holy ****... this is not a fiberglass repair at all... this needs to be cut out and welded with a patch panel... i was thinking of the spoiler problems that everyone has... that is serious rust... but anyway...
what you are going to do here is cut out the metal that is rusted... cut about an inch farther than the hole... then get some 18 gague sheet metal and form it to the contours of the hole... and weld it into place... i cant tell where that rust is so if you could tell me what part that is i will give you a more detailed set of instructions... or you can catch me on aim wikd24d and i will help ya there...
what you are going to do here is cut out the metal that is rusted... cut about an inch farther than the hole... then get some 18 gague sheet metal and form it to the contours of the hole... and weld it into place... i cant tell where that rust is so if you could tell me what part that is i will give you a more detailed set of instructions... or you can catch me on aim wikd24d and i will help ya there...

Thread
Thread Starter
Forum
Replies
Last Post
Aznplayer911
Show and Shine
15
Dec 3, 2003 08:23 AM

