
DIY INTAKE MANIFOLD porting for Natural aspiration

DIY INTAKE MANIFOLD porting for Natural aspiration
I thought I would start a thread for us N/A builders on intake manifold porting honing since my time has been past due. I promised a thread on it.
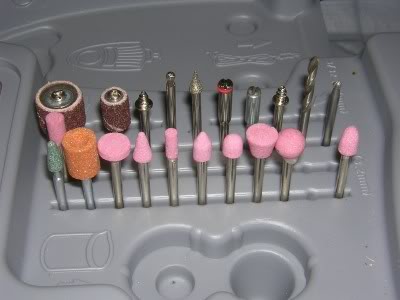
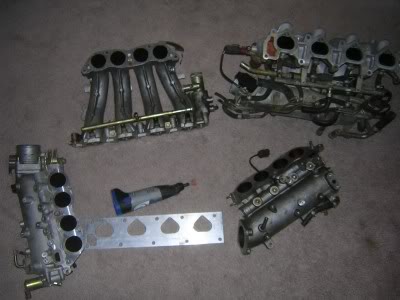
So to begin first off you will need the required items.
Intake manifold gaskets.
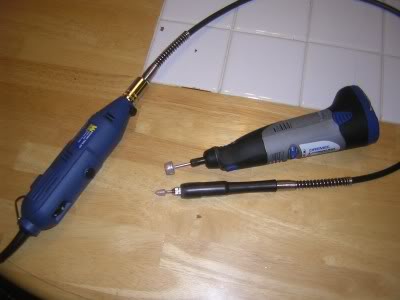
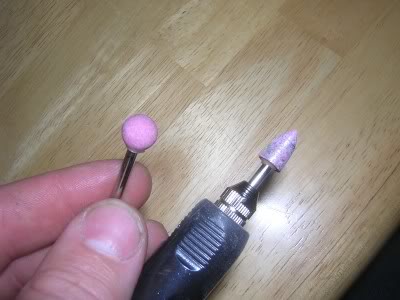
A dremel with up to 35000RPM variable speed adjustments and FLEX shaft.
At least a variety of 10 assortment different shape grinding stones.
Wire wheel assortment.
It's also nice to have a vacuum for clean out.
As well as a sanding assortment of 80grit sanders, and sand flaps 80,120,320grit(not shown in the pic).
Aluminum Oxide polishing abrasives 120grit, and 320 grit(not shown in the pic)
Always remember safety first and get some ANSI certified safety glasses aluminum shards can permanently damage your eye's.
Dust mask as well unless your the type that like aluminum poisoning of the blood, or early lung cancer.
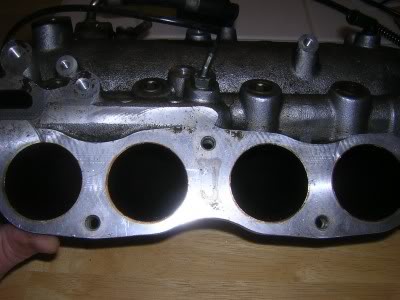
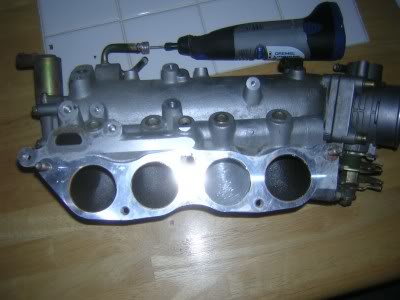
So to begin I didn't have the intake manifold gaskets available. They are special order, what I ordered were the standard felpro intake manifold gaskets. The gaskets cost $11.99. The reason why it isn't a big deal to have them at this moment is that an outline from the exhaust gasses already gave me a good traced circle of where I wanted to start and begin.
Now personally I don't clean the manifolds prior to porting. Reason being is that the dark exhaust gasses leave traced outlines of where I had or had not done the work needed. I must let people know in advance that porting is tricky, and very meticulous it isn't just something you get into and hack up, it does take finesse, so that when your work is finished you don't create divot's in the manifold that can interrupt intake flow.
Now I mentioned that all you need is a dremel with flex shaft. That is correct so don't mind my pics, I just like to have more than one tool readily available and the dremel does wear out do to it being cordless.
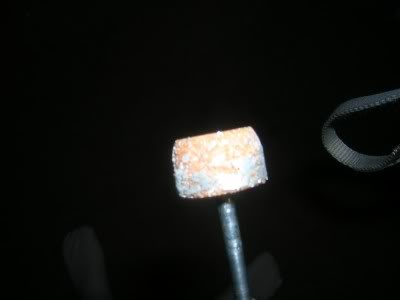
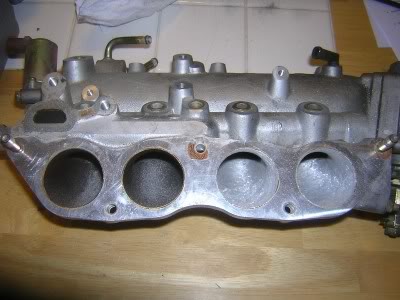
So to begin you need to take a tubular cylinder grinding bit out. You also need to treat the aluminum lightly. Use circular motion at all times when grinding out your ports. If you don't it can cause a divot. A comfortable speed to have the dremel at is at about 18,000RPM.
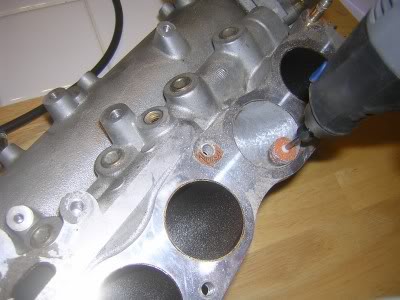
Now the whole idea isn't to make your porting to large. If the porting is larger than it should be then you decrease the velocity of air that you want to cram into the cylinder, so for that reason I still leave just a slight amount of the exhaust gas ring. In all, each port will only increase about 1mm in diameter. This way I don't lose any significant low end torque and I can get a little more pep in the mid range and high RPM's.
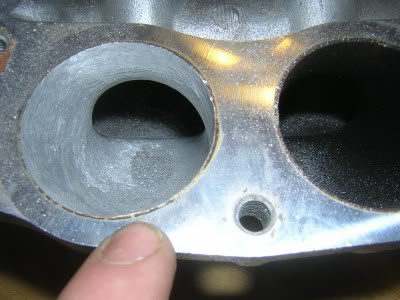
Now the tricky part is to extrude the runners. This means that you will need to use the flex shaft to move down the runner. I recommend using the same bit that we started with for the porting. When the shaft begins to get to much curvature you want to move to a much more rounded bit. I use one that I call the bullet, and the round grind.
Now this is a meticulous process just to do the lower half of the manifold each runner takes about 1hour to properly grind out the material and shaving. It is also important to remember the time it takes to grind out each runner as you can only extrude as much material within the amount of time it takes for each runner. That way keeping a time frame will leave each runner just about the same as the next.
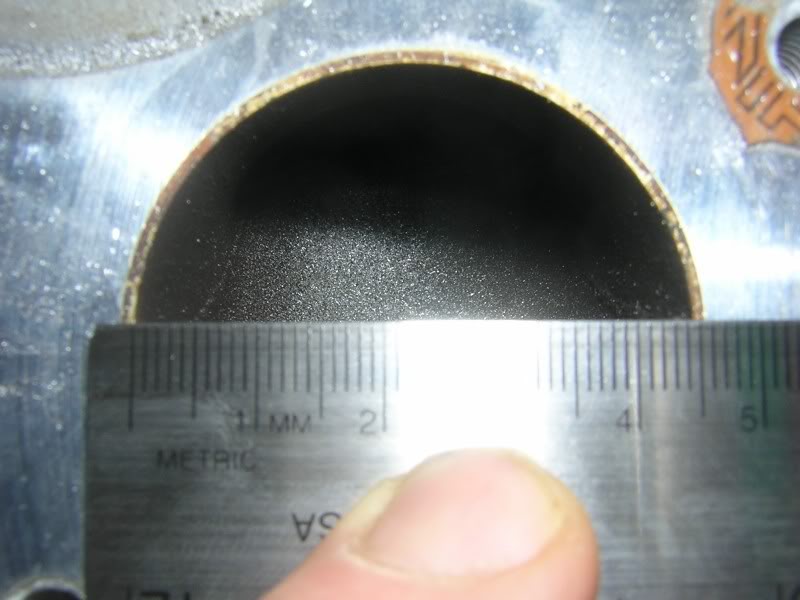
As an end result of grinding one runner this is what you should come up with or somewhat similar. Remember the runner still hasn't been sanded so the edges still look rough.
BEFORE
AFTER
More to come within the week!!!!
So to begin first off you will need the required items.
Intake manifold gaskets.
A dremel with up to 35000RPM variable speed adjustments and FLEX shaft.
At least a variety of 10 assortment different shape grinding stones.
Wire wheel assortment.
It's also nice to have a vacuum for clean out.
As well as a sanding assortment of 80grit sanders, and sand flaps 80,120,320grit(not shown in the pic).
Aluminum Oxide polishing abrasives 120grit, and 320 grit(not shown in the pic)
Always remember safety first and get some ANSI certified safety glasses aluminum shards can permanently damage your eye's.
Dust mask as well unless your the type that like aluminum poisoning of the blood, or early lung cancer.
So to begin I didn't have the intake manifold gaskets available. They are special order, what I ordered were the standard felpro intake manifold gaskets. The gaskets cost $11.99. The reason why it isn't a big deal to have them at this moment is that an outline from the exhaust gasses already gave me a good traced circle of where I wanted to start and begin.
Now personally I don't clean the manifolds prior to porting. Reason being is that the dark exhaust gasses leave traced outlines of where I had or had not done the work needed. I must let people know in advance that porting is tricky, and very meticulous it isn't just something you get into and hack up, it does take finesse, so that when your work is finished you don't create divot's in the manifold that can interrupt intake flow.
Now I mentioned that all you need is a dremel with flex shaft. That is correct so don't mind my pics, I just like to have more than one tool readily available and the dremel does wear out do to it being cordless.
So to begin you need to take a tubular cylinder grinding bit out. You also need to treat the aluminum lightly. Use circular motion at all times when grinding out your ports. If you don't it can cause a divot. A comfortable speed to have the dremel at is at about 18,000RPM.
Now the whole idea isn't to make your porting to large. If the porting is larger than it should be then you decrease the velocity of air that you want to cram into the cylinder, so for that reason I still leave just a slight amount of the exhaust gas ring. In all, each port will only increase about 1mm in diameter. This way I don't lose any significant low end torque and I can get a little more pep in the mid range and high RPM's.
Now the tricky part is to extrude the runners. This means that you will need to use the flex shaft to move down the runner. I recommend using the same bit that we started with for the porting. When the shaft begins to get to much curvature you want to move to a much more rounded bit. I use one that I call the bullet, and the round grind.
Now this is a meticulous process just to do the lower half of the manifold each runner takes about 1hour to properly grind out the material and shaving. It is also important to remember the time it takes to grind out each runner as you can only extrude as much material within the amount of time it takes for each runner. That way keeping a time frame will leave each runner just about the same as the next.
As an end result of grinding one runner this is what you should come up with or somewhat similar. Remember the runner still hasn't been sanded so the edges still look rough.
BEFORE
AFTER
More to come within the week!!!!
Last edited by BigVinnie; May 17, 2007 at 08:43 PM.

Once the felpro gaskets come in I'll show you the fitment.
Last edited by BigVinnie; May 11, 2007 at 05:40 PM.
no i mean something like 5/16"(example) thick gasket. i've seen them for the 350z. they supposedly yield like 12whp when used on the intake mani to head and between the runners and intake mani.

My idea was to compare just the boring and honing, along with the removal of SCV's to see what a total HP yield was for my OBD1 engine. So for this experiment I will be using the felpro's.
If someone else would like to join in on this thread to see what the additional yield in power would be that would be great. But I am already under the assumption that the runner lengths are long enough and adding anymore length to the runners (using thicker gaskets) could be detrimental to losing power in the low end, especially since the KA isn't as rev happy as the VQ35de.
For sure I'll keep you updated... BTW how did you bore the TB, I've been looking into several processes for doing that myself as well. Did you you use drill press with a template, or dremel?
Registered User
Joined: Feb 2006
Posts: 33
From: down south
ya know, if someone had an idea of what type of rubber is used for the thicker gasket they use on the 350z intake, i'm sure you could make your own, www.smoothon.com carrise alot of different rubbers and plastics, i wonder....
i hand sanded it with 80 150 and 400 grit then polished it. for the first attempt it came out nice.
Now a completion of 2 hours spent. Completed the bottom half runner one. I'm noticing that I will need more grinding bits.LOL Gaskets in on Wednesday..
Last edited by BigVinnie; May 12, 2007 at 04:35 PM.
LOL... I know man I've been lazy. I told myself that I need to get off my butt and finally show everyone the DIY's.... I've been holding out like a Royal flush...
Last edited by BigVinnie; May 13, 2007 at 05:53 PM.
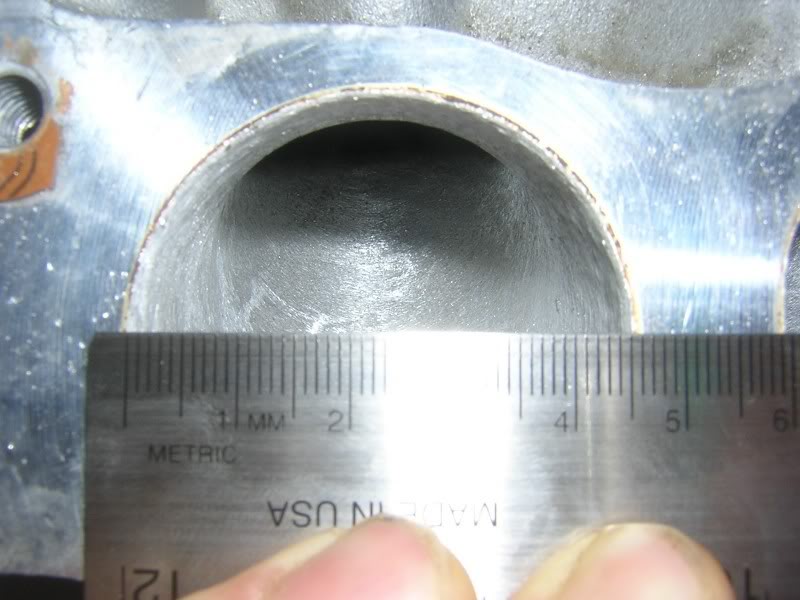
Checking some of my work. It appears that my eye's don't fail me. By the time I sand and polish, it will be 1mm on the bullseye.
Before
After
Before
After
Last edited by BigVinnie; May 13, 2007 at 06:04 PM.

Registered User
Joined: Sep 2006
Posts: 33
From: Santa Rosa CA
350z Gasket
The reason why running a thicker gasket on the 350z nets you some horse power is because the upper manifold slopes towards the front of the engine and the front cylinders end up getting less air then the rear. Each cylinder doesn�t have its own runner like our engines do.
The aftermarket gasket spacers on the 350�s are actually thicker at the front then they are at the back which some how helps the front cylinders get more air. Also, since there aren�t individual runners, the gasket acts the same way as porting our runners does.
http://www.gruppe-s.com/350z/zeng/skunk2spacer.htm
At least, that�s how I understand it. I�m no expert. I believe a spacer on our intake mani would result in a decrease of power at the top end because it would lengthen our intake track.